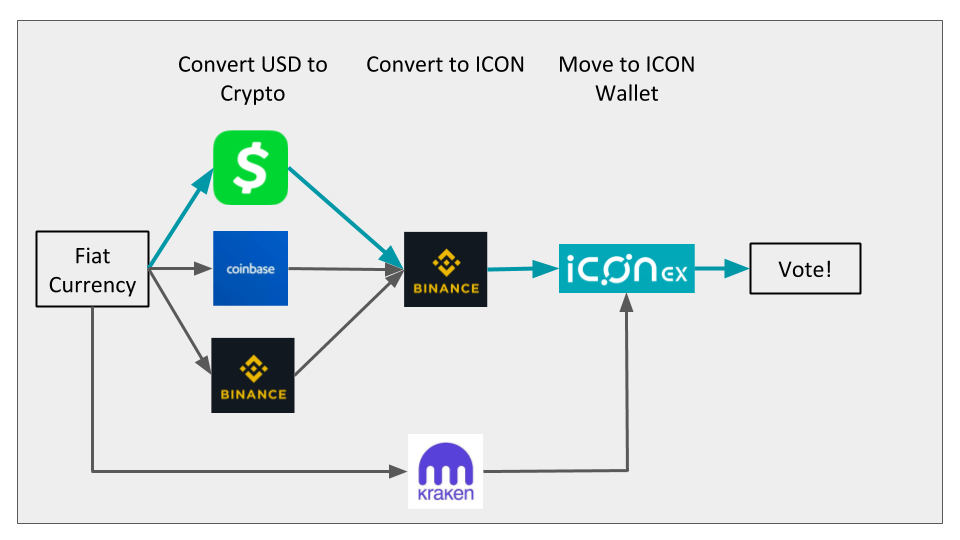
Your friendly guide for voting in the ongoing election to secure the future of ICON’s on-chain governance. We’ll take you step-by-step through converting your fiat currency (dollars, euros, etc) into ICX tokens and staked votes for any P-Rep candidate.
Voting Process from scratch
Participating in the upcoming vote for the future of ICON’s infrastructure is easy and can be done in the following 6 steps:
- Convert dollars (USD) to bitcoin (BTC) at a fiat-to-crypto exchange
- Move BTC to an crypto-to-crypto exchange
- Trade BTC for the ICON token (ICX)
- Create ICON Wallet
- Move ICX from exchange to ICON wallet
- Stake and Vote
Below I’ll go through each step with visuals and descriptions.
1. Create an account to convert USD to major cryptocurrency
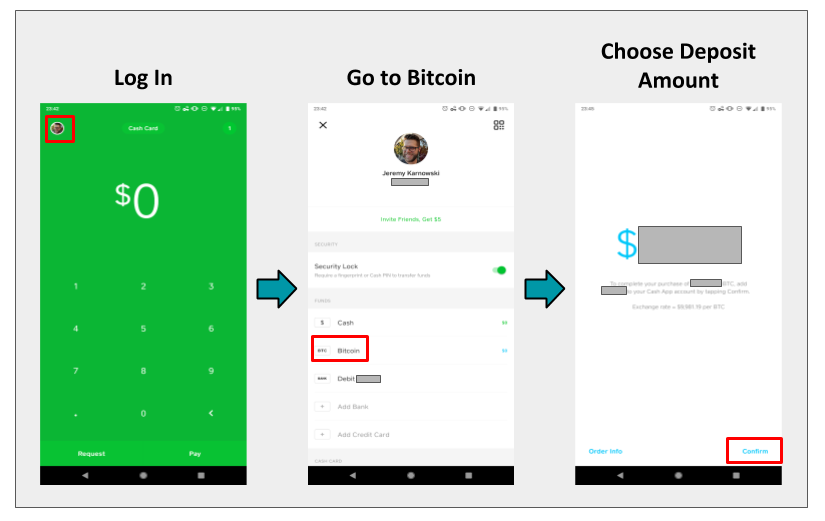
There are several ways to move fiat currency (here US Dollars) to cryptocurrency. Some major fiat-to-crypto on-ramps include Square, Coinbase, and Binance.
For this post, I will use Square Cash for its ease of use and ability to quickly transfer things on mobile. In the past I’ve used Coinbase and found it very user friendly, so I’d recommend it as well.
For each of these systems, in order to buy/sell crypto and transfer it to an exchange, you also typically have to provide a picture of yourself and a form of physical ID (e.g. driver’s license). This isn’t shown in the picture above, but you will likely either be prompted or find the section where it’s needed.
To actually buy Bitcoin in Square Cash, navigate to your profile, click on the Bitcoin section, click on “Buy”, choose an amount, and confirm.
2. Move funds to a cryptocurrency exchange
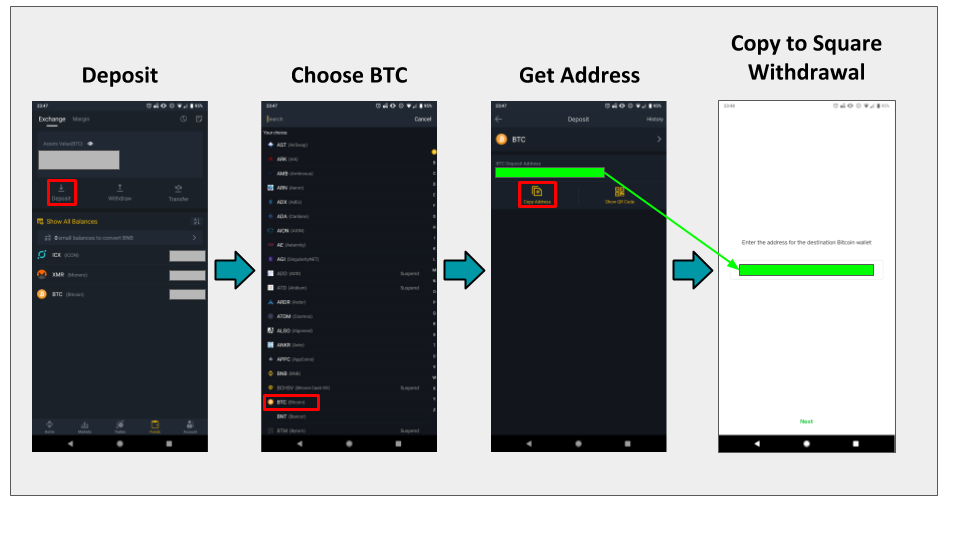
There are many cryptocurrency exchanges, but one of the largest ones, and the one I’m focusing on here also because of its ease of use on mobile is Binance. Another that’s widely available in the US is Kraken.
After creating an account, you can navigate to the tab that shows your funds (if this is your first time using Binance, it should be empty). If you click on the deposit button, it will take you to a screen that shows all the cryptocurrencies Binance supports. Navigate to BTC, where Binance will provide you with an address to receive BTC.
Since Step 1 above gave us Bitcoin (BTC) in a wallet managed by Square, we need to transfer this to Binance for conversion to ICX. You will to “withdraw” your BTC from Square and send to the “deposit” address provided by Binance.
If you are using the Square Cash app, initiating this transfer pops open a screen that requests an address of where to send the BTC. Use the copied Binance address here and then enter it again to confirm. Triple check that you copied the correct address in its entirety.
Disclaimer: There will be two waiting periods now: First, it may take a moment for Square Cash to broadcast your transaction to the Bitcoin blockchain. Once miners have included your transaction, Binance will wait for a few blocks (~20 minutes) to consider the transactions confirmed/settled. Congrats, you have now just experienced one of the pain points of older cryptocurrency systems and can make judgements about newer faster systems.
3. Trade bitcoin to get ICX tokens
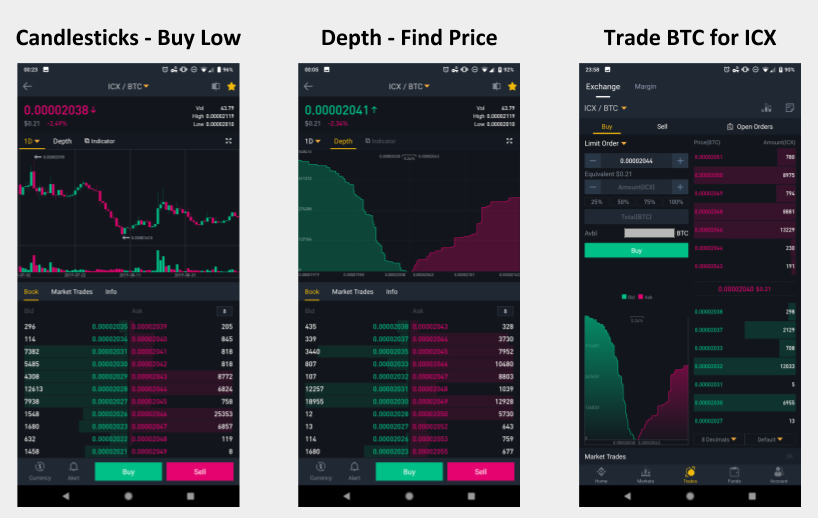
On Binance, you can navigate to the Markets tab and search for ICX to get the trading information for ICX/BTC. The graph shown is a candlestick graph, where each of the bars shows the opening and closing prices as well as the highs and lows of a certain period.
On the top left of the chart, you can choose the length of time for the candlesticks. For example, if it is set for 1D, then you see the trading information at the scale of a day, while if it is set at 1H, then you see the information at the scale of an hour. Depending on how often you are trading, you can change the graph to compensate. A period of upward greens means there is more buying of ICX and people are bullish, while a period of downward reds means there is more selling of ICX and people are bearish. There are whole industries of people that investigate these patterns visually or algorithmically for trading, but take it all with a grain of salt.
Buy low and sell high — if you see there has been some dropping in red and you think there will be a shift to more greens, that’s a good time to shift your BTC to ICX for a better exchange rate.
You can also check out the Depth, which shows you the orders that are open for people who are buying and selling this cryptocurrency pair. The left hand side in green shows people who are asking to buy certain amounts of ICX at certain BTC prices. Similarly, the right hand side in red shows people who are willing to sell certain amounts of ICX at certain BTC prices. The right hand side will show you whether the price you want might be possible given the people who are currently selling.
Try to buy as much ICX at the lowest price you can.
For more information on other aspects of the Binance platform, using the desktop graphics, check out this link.
4. Create ICON wallet
Visit ICON’s website and then go to create a Wallet in the upper menu. ICON also has a mobile app but it doesn’t look like it currently supports voting, so for now we’ll use the desktop version.

5. Transfer funds to wallet
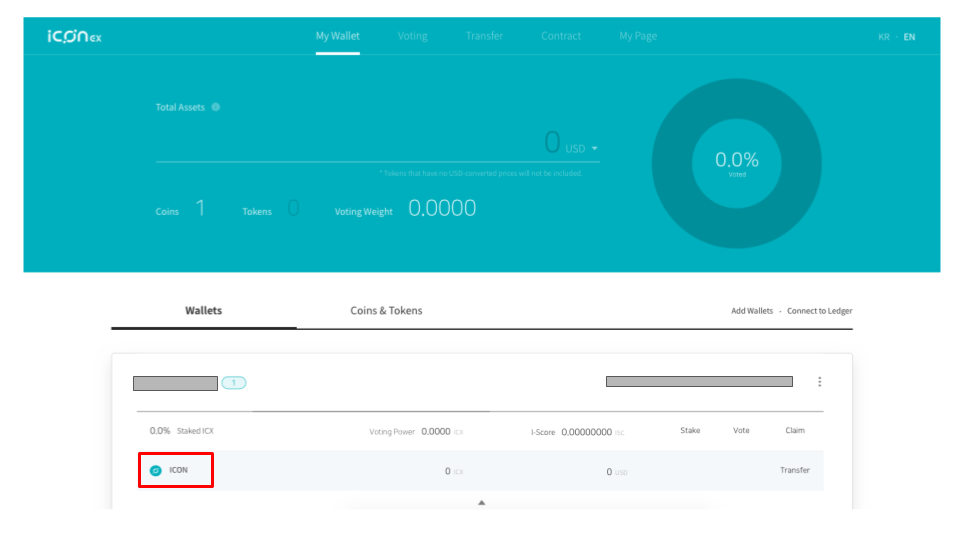
Once the wallet is created, it’s only a matter of finding the address so that you can send the ICX from Binance to the ICONex wallet.
Click on the ICON section to get to an address for ICX deposits:
On the Funds tab of Binance, choose to withdraw ICX. Then choose the amount — here I’ve chosen 100.02 ICX (to cover 0.02 fee), which is roughly $20 at the time of writing.
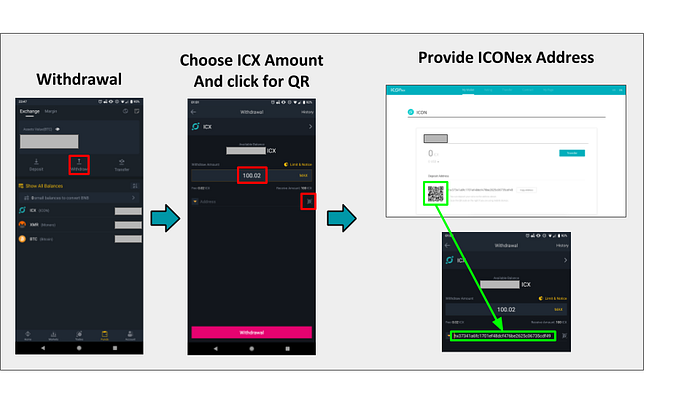
After submitting the transfer, once complete, the balance will show up in your ICONex wallet:

6. Stake and Vote
Now that you have ICX available, you are able to stake and vote for the P-Rep Nodes that you find the most meaningful for keeping the ecosystem secure and stable. Check out our guide about how to decide which P-Rep to vote for. Nodes have several crucial responsibilities, and can be evaluated based on:
- Track record for maintaining secure & stable infrastructure
- Team with a solid background
- Community contributions: code, education, organization
For this article, I will demonstrate how to vote for Insight-ICON, who have built a lot of the core infrastructure for P-Rep nodes, have a growing team of blockchain engineers and DevOps engineers for continual support, and give educational support back to the community on topics like infrastructure.
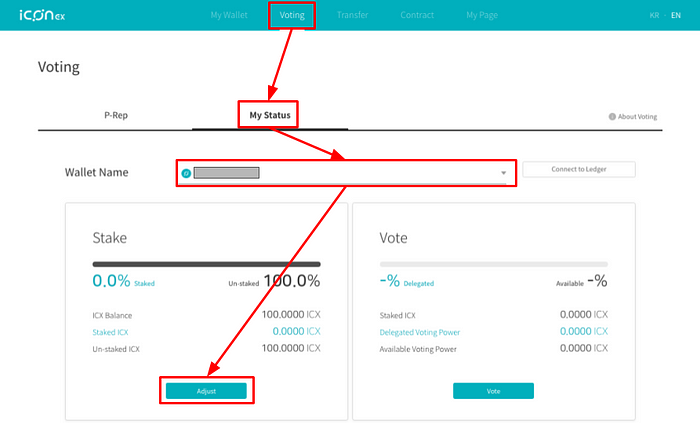
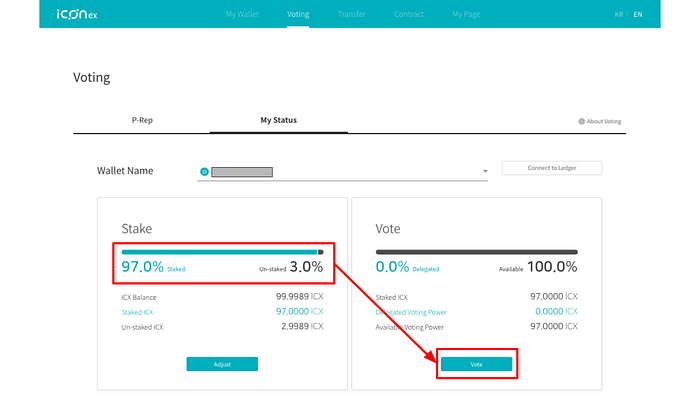
The first step is to navigate to the Voting tab, then click on My Status, then choose your wallet, then click Adjust under the Stake section.
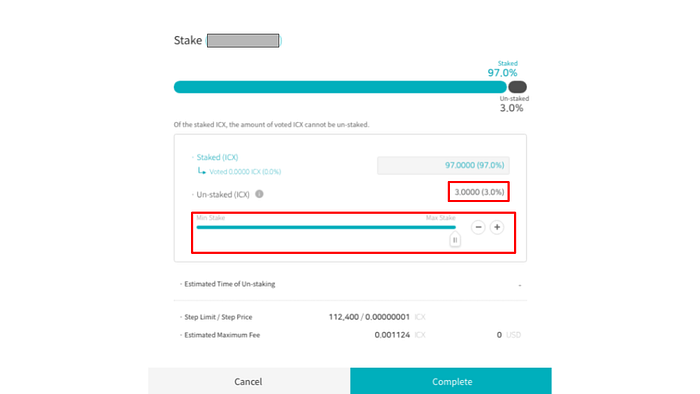
On the pop-up window, choose the amount you wish to stake. If you wish to stake everything, you still must leave 3 ICX in case you want to un-stake locked tokens (the wallet will automatically ensure this).
After completing the staking, you can see the amount you have staked and can choose to vote:
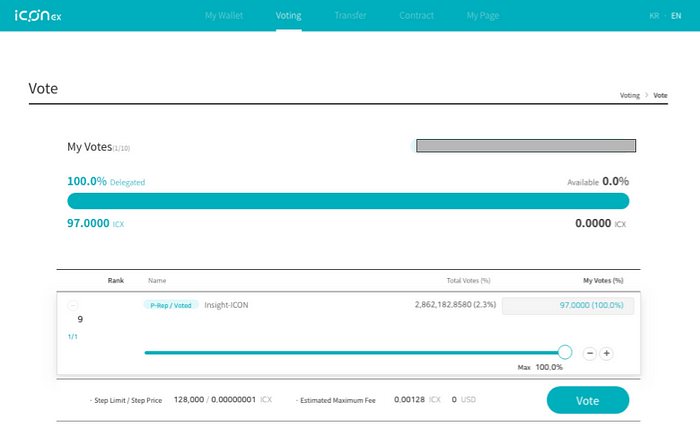
From the list of P-Rep nodes listed, you can click the + button on the left hand side to add it to your list of nodes that you want to support. As mentioned above, I will be voting for Insight-ICON.

The nodes you select get added above, and after clicking on their name, you can use the scroll-bar to select how many votes you’d like to assign to each team.
Final Word
And that’s it — you’ve turned US Dollars into ICON, become part of the community, and voted for a more stable and secure infrastructure.
(this post was originally hosted on Medium)