Everyone is looking towards TensorFlow to begin their deep learning journey. One issue that arises for aspiring deep learners is that it is unclear how to use their own datasets. Tutorials go into great detail about network topology and training (rightly so), but most tutorials typically begin with and never stop using the MNIST dataset. Even new models people create with TensorFlow, like this Variational Autoencoder, remain fixated on MNIST. While MNIST is interesting, people new to the field already have their sights set on more interesting problems with more exciting data (e.g. Learning Clothing Styles).
In order to help people more rapidly leverage their own data and the wealth of unsupervised models that are being created with TensorFlow, I developed a solution that (1) translates image datasets into a file structured similarly to the MNIST datasets (github repo) and (2) loads these datasets for use in new models.
To solve the first part, I modified existing solutions that demonstrate how to decode the MNIST binary file into a csv file and allowed for the additional possibility of saving the data as images in a directory (also worked well for testing the decoding and encoding process).
I then reversed the process, making sure to pay attention to how these files were originally constructed (here, at the end) and encoding the information as big endian.
The TensorFlow tutorials allow you to import the MNIST data with a simple function call. I modified the existing input_data function to support the loading of training and testing data that have been created using the above procedure: input_any_data_unsupervised. When using this loading function with previously constructed models, remember that it does not return labels and those lines should be modified (e.g. the call to next_batch in line 5 of this model).
A system for supervised learning would require another encoding function for the labels and a modified input function that uses the gzipped labels.
I hope this can help bridge the gap between starting out with TensorFlow tutorials with MNIST and diving into your own problems with new datasets. Keep deeply learning!
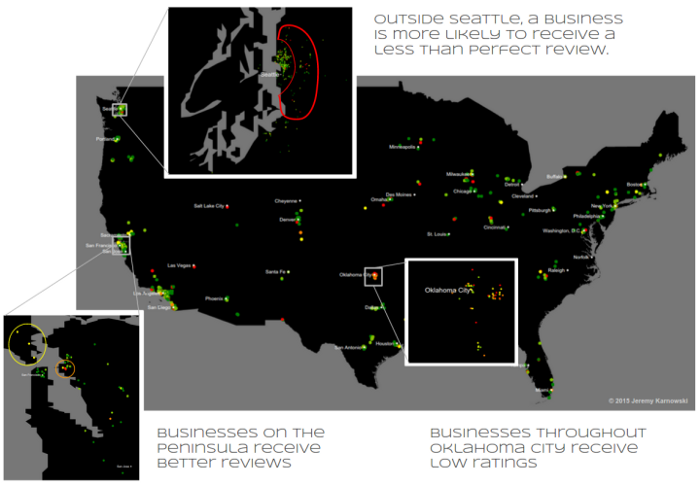
In order to prepare for the Insight Data Science program, I have been spending some time on acquiring/cleaning data, learning to use a database (MySQL) to store that data, and trying to find patterns. It is uncommon in academia to search for patterns in data in order to improve a company’s business, so I thought I should get some practice putting myself in that mindset. I thought an interesting idea would be to visualize the rated organizations from deaffriendly.com on a map of the U.S. to identify patterns and provide some insights for the Deaf community.
Thiscould be useful for a variety of reasons:
We could get a sense of where in the U.S. the website is being used.
We could identify cities that receive low ratings, either because businesses are unaware of how to improve or because the residents of that city have different rating thresholds. This could help improve the ability to calibrate reviews across the country.
We could identify regions in cities that do not receive high reviews to target those areas for outreach.
Further work to provide a visual version of the website could allow users to find businesses on the map in order to initiate the review process.
In the above image, I plotted reviews from deaffriendly.com and highlighted some interesting patterns. While qualitatively these statements seem true, the next step would be to do a more in depth study. Also, a future version of this map could look similar to Yelp’s Wordmap or the Health Facility Map which uses TZ Open Data Portal and OpenStreetMap.
Why was this of interest to me?
As a PhD student at UCSD, I am friends with many people who are in the Center for Research in Language and work with Carol Padden studying sign language. I participated as a Fellow in the recent CARTA Symposium on How Language Evolves and was paired with David Perlmutter (PhD advisor to Carol Padden) who presented on sign language. While I have not studied sign language in my research, the Deaf community is one that interests me and I thought I would help out if I could.
In June of this year, I was the chair and organizer for the inter-Science of Learning Conference, an academic conference that brings together graduate students and postdoctoral fellows from the six NSF-Sponsored Science of Learning Centers. One of these centers is VL2 which is associated with Gallaudet University. As part of the conference, I organized interpreter services and used CLIP Interpreting as they were highly recommended by many groups (and VL2 students said they were the best interpreters they had ever had). At the end of the conference CLIP Interpreting told the VL2 students and the iSLC organizers about deaffriendly.com and encouraged us to contribute to the website. This was my chance to pay it forward. I highly recommend using deaffriendly.com and helping them expand their impact.
A few months ago Andrej Karpathy wrote an excellent introductory article on recurrent neural networks, The Unreasonable Effectiveness of Recurrent Neural Networks. With this article, he released some code (and larger version) that allows someone to train character-level language models. While RNNs have been around for a long time (Jeff Elman from UCSD Cognitive Science did pioneering work in this field), the current trend is implementing with deep learning techniques organizationally different networks that attain higher performance (Long Short-term memory networks). Andrej demonstrated the model’s ability to learn the writing styles of Paul Graham and Shakespeare. He also demonstrated that this model could learn the structure of documents, allowing the model to learn and then produce Wikipedia articles, LaTeX documents, and Linux Source code.
Tom Brewe’s project to learn and generate cooking recipes, along with Karpathy’s demonstration that the network can learn basic document syntax, inspired me to do the same with job postings. Once we’ve learned a model, we can see what dream jobs come out of its internal workings.
To do this, I performed the following:
Obtain training data from indeed.com:
Create a function that takes city, state, and job title and provides indeed.com results
Gather the job posting results, scrape the html from each, clean up html
Save each simplified html file to disk
Gather all the simplified html files and compile one text file
2. Use recurrent neural network to learn the structure of the job postings
3. Use the learned network to generate imaginary job postings
Obtaining Training Data
In order to obtain my training data, I scraped job postings from several major U.S. cities from the popular indeed.com (San Francisco Bay Area, Seattle, New York, and Chicago). The code used to scrape the website came from this great tutorial by Jesse Steinweg-Woods. My modified code, available here, explicitly checked if a website was located on indeed.com (and not another website as the job posting structure was different) and stripped the website down to a bare bones structure. Having this more specific structure I thought would help reduce the training time for the recurrent neural network. Putting these 1001 jobs into one text document gives us a 4.2MB text file, or about 4 million characters.
Training the Recurrent Neural Network
Training the RNN was pretty straight forward. I used Karpathy’s code and the text document generated from all the job postings. I set up the network in the same manner as the network Karpathy outlined for the writings of Shakespeare:
I trained this network over night on my machine that has a Titan Z GPU (here is more info on acquiring a GPU for academic use).
Imaginary Job Postings
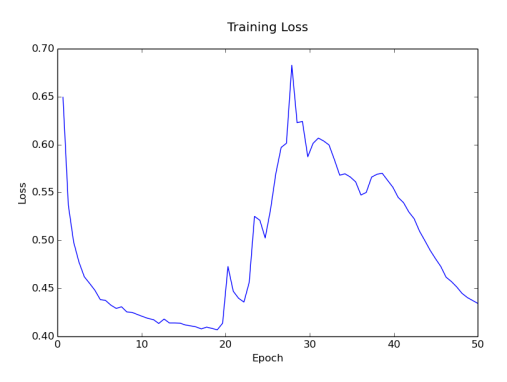
The training procedure produces a set of files that represent checkpoints in training. Let’s take a look at the loss over training:
It looks like the model achieved pretty good results around epoch 19. After this, the performance got worse but then came back down again. Let’s use the checkpoint that had the lowest validation loss (epoch 19) and the last checkpoint (epoch 50) to produce samples from the model. These samples will demonstrate some of the relationships that the model has learned. While none of these jobs actually exist, the model produces valid html code that represents imaginary dream job postings.
Below is one of the jobs that was produced when sampling from the saved model at epoch 19. It’s for a job at Manager Persons Inc. and it’s located in San Francisco, CA. It looks like there is a need for the applicant to be “pizza friendly” and the job requires purchasing and data entry. Not too shabby. Here it is as a web page.
At epoch 50, the model has learned a few more things and the job postings are typically much longer. Here is a job for Facetionteal Agency (as a website). As you can see, more training can be done to improve the language model (“Traininging calls”) but it does a pretty good job of looking like a job posting. Some items are fun to note, like that the job requires an education of Mountain View, CA.
Below is another longer one (and as a website). Turns out the model wants to provide jobs that pay $1.50 an hour. The person needs to be a team player.
Conclusion
This was a pretty fun experiment! We could keep going with this as well. There are several knobs to turn to get different performance and to see what kind of results this model could produce. I encourage you to grab an interesting dataset and see what kind of fun things you can do with recurrent neural networks!
Principal Component Analysis (PCA) is an effective tool for dimensionality reduction, transforming high dimensional data into a representation that has fewer dimensions (although these dimensions are not from the original set of dimensions). This new set of dimensions captures the variation within the high dimensional dataset. How do you find this space? Well, PCA is equivalent to determining the breakdown M = L + E, where L is a matrix that has a small number of linearly independent vectors (our dimensions) and E is a matrix of errors (corruption in the data). The matrix of errors, E, has been minimized. One assumption in this optimization problem, though, is that our corruption, E, is characterized by Gaussian noise [1].
Sparse but large errors affect the recovered low-dimensional space.
From:
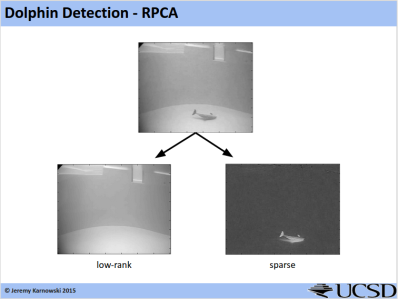
Robust PCA [2] is a way to deal with this problem when the corruption may be arbitrarily large, but the errors are sparse. The idea is to find the breakdown M = L + S + E, where we now have S, a matrix of sparse errors, in addition to L and E. This has been shown to be an effective way for extracting the background of images (the static portion that has a lower dimensionality) from the foreground (the sparse errors). I’ve used this in my own work to extract foreground dolphins from a pool background (I used the ALM method which only provides L and S).
Robust PCA can be solved exactly as a convex optimization problem, but the computational constraints associated with high dimensional data make exact solutions impractical. Instead, there exist fast approximation algorithms. These techniques include the inexact augmented Lagrange multiplier (ALM) method [1] and the alternating direction method of multipliers (ADMM) method [3].
Since the ADMM method is supposed to be faster than the ALM method (here on slide 47), I thought it would be a good idea to translate this code to a working Python version. My translation, Robust Principal Component Analysis via ADMM in Python, implements the MATLAB code found here (along with [a] and [b]). In addition to porting this code to Python, I altered the update equations to use multiple threads to speed up processing.
The ever decreasing costs of hardware and the rise of Maker culture is allowing hobbyists to take advantage of state of the art tools in robotics and computer vision for a fraction of the price. During my informal public talk in San Diego’s Pint of Science event “Machines: Train or be Trained” I talked about this trend and got to show off the results of a side project I had been working on. My aim in the project was to create a robot that was capable of acting autonomously, had computer vision capabilities, and was affordable for researchers and hobbyists.
When I was an undergrad at IU in the Computational Cognitive Neuroscience Laboratory the trend was using Khepera robots for research in Cognitive Science and Robotics. These robots run close to $2800 today. Years later I was fortunate to help teach some high school robotics courses (Andrew’s Leap and SAMS) with David Touretzky (here are videos of course projects) and got to see first-hand the great work that was being done to turn high level cognitive robotics into a more affordable option. In the past few years, I’ve been helping to develop the introductory programming and robotics course (Hands-on Computing: SP13, SP14, FA15, SP15) here in the UCSD Cognitive Science department and have really enjoyed using theflexible platform and materials from Parallax (about the course).
For awhile now, my advisor and I wanted to set up a multi-agent system with robots capable of using computer vision. While there exist some camera solutions for Arduino, the setup was not ideal for our aims. My friends had recently used the Raspberry Pi to create an offline version of Khan Academy and it seemed likely that the Raspberry Pi was up to the task.
Parts
I borrowed the chassis of the BOE Bot (includes wheels) and compiled this list of materials (totaling around $250 with the option of going cheaper, especially if you design your own chassis):
While I had some issues with setting up wifi (UCSD has a protected network) and configuring an ad-hoc network, I don’t think it’s impossible to do. This was the procedure I followed to get the robot set up:
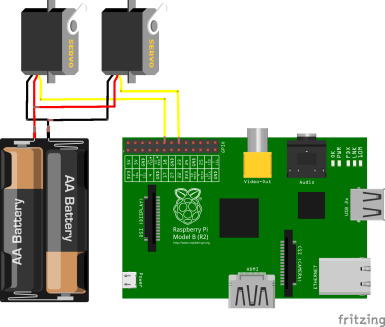
The battery that powers the Raspberry Pi does not have enough power to run the Raspberry Pi and the servos at the same time. I used the battery pack from the BOE Bot and connected two wires to the servos — one at the point in the battery pack where the power starts and one where it ends, in order to use the batteries in a series. Much of the wiring is based on the diagram found here. The pin numbers for the Raspberry Pi can be found here (also shows how to blink an LED). Here is an updated diagram (while the diagram shows 2 batteries, there were actually 5):
Python
Learning python is awesome and will help with any projects after this one:
The easiest way to draw a circle on an image involves using cv2, the second version of opencv (code modified from here).
Demo
And finally, below is a demo to show off the proof of concept. This awesome (!) article shows how to use the Raspberry Pi Camera with OpenCV and Python (I found the ‘orangest’ object in the frame and had the robot turn towards it) and the above shows how to create circles on the images for display. I don’t recommend using the computer to view the output as this drastically slows down processing. It’s nice for a demo though! I hope you enjoyed this and found this useful!
In July 2015, I attended DCLDE 2015 (Detection, Classification, Localization, and Density Estimation), a week-long workshop focusing on methods to improve the state of the art in bioacoustics for marine mammal research.
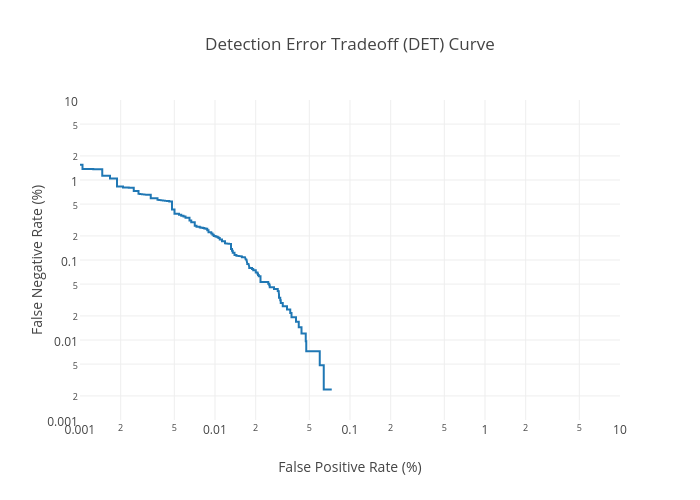
While I was there, I had a conversation with Tyler Helble about efforts to detect and classify blue whale and fin whale calls recorded off the coast of Southern California. While most researchers use Receiver Operating Characteristic (ROC) curves or Precision Recall (PR) curves to display classifier performance, one metric we discussed was Detection Error Tradeoff (DET) curves [1]. This might be a good metric when you are doing a binary classification problem with two species and you care how it is incorrectly classifying both species. This metric has been used several times in speech processing studies and has been used in the past to look at classification results for marine bioacoustics [2].
I typically program in Python and use the scikit-learn package for machine learning problems. They have an extensive listing of classification metrics, but I noticed the absence of DET curves. I had never created a pull request for a well known python package before, but I thought I would give it a try: DET curve pull request (as of writing this, there still remains some work to be done on the documentation). For those of you who are interested in doing something similar, here is how to contribute to scikit-learn.
The detection_error_tradeoff function, which takes in a list of prediction values and a list of truth values, produces an output containing the false positive rate (FPR) and false negative rate (FNR) for all threshold values. The DET curve, the line showing the tradeoff between FPR and FNR, is typically viewed in a log-log plot. While Python can easily alter its axes, the default graph does not display the typical tick values as shown in standard speech processing DET curves: 0.1, 0.2, 0.5, 1, 2, 5, 10, 20, 50. In order to create a plot like this, I created the function DETCurve below. An obvious improvement would be for the function to automatically determine the lower bounds for the ticks and adjust accordingly. The alterations to the axes are necessary to ensure matplotlib does not try to plot zero on the log plot (which would set it to infinity and cause issues).
Whereas I had to adjust a lot of things manually in matplotlib, the fancier looking Plotly automatically uses the tick marks associated with plots of this kind:
Attending conferences and presenting research is a frequent event in the life of an academic. Conference organizing committees that plan these events have a lot on their plate. Even small conferences, such as the one I organized in 2015 (iSLC 2015), can be very demanding.
One thing that conference organizers have to consider is how to implement an article and/or abstract submission process that allows attendees, reviewers, and organizers to fluidly access and distribute these documents. Some of these services are free while others are a paid service. Some services provide better and a more adaptive pipeline for this process.
An important feature of these abstract submission sites is allowing the tagging of abstracts so that organizers can appropriately distribute the content to the best reviewers.
I was approached awhile back because some conference organizers were using an abstract submission site that did not have this feature, so how to distribute the submissions was an open question. Furthermore, the submission website had a suboptimal interface that forced the organizers to download each individual abstract separately rather than as a whole. As a final annoyance to the organizers, the submission process was one such that researchers could submit their work in a variety of formats, including .doc, .docx, .odt, and .pdf files and the conference organizers did not have a way to automatically analyze each of these file types.
To tackle these issues, we settled on the following procedure:
Automatically authenticate with website
Scrape the conference abstracts from the conference website, downloading all attachments
Convert each document into plain text using a variety of packages and combine all text documents into a large listing of all abstracts
Use the combined abstract file to extract individual submissions and use text mining packages to categorize the abstracts
Distribute the abstracts to the appropriate reviewers
Here is the code I wrote to perform steps 1–3. The conference organizers did the text mining and distribution. After the automatic extraction, there were still a tiny number of abstracts that were not converted properly, so this was done by hand. In the end, this saved a massive amount of time and allowed the conference preparation to proceed in an efficient manner.
Improvements on this could include creating more modular code, making the authentication process more secure, and creating a function that accepts a file and returns the text from that document. I hope some of this code may be useful in your future tasks!
I’ve been diving into deep learning methods during the course of my PhD, which focuses on analyzing audio and video data to uncover patterns relevant to the dolphin communication. I obtained a NVIDIA Titan Z through an academic hardware grant and installed Caffe to run jobs on the GPU using Python.
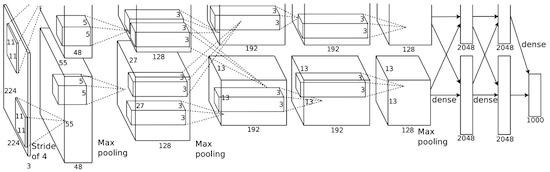
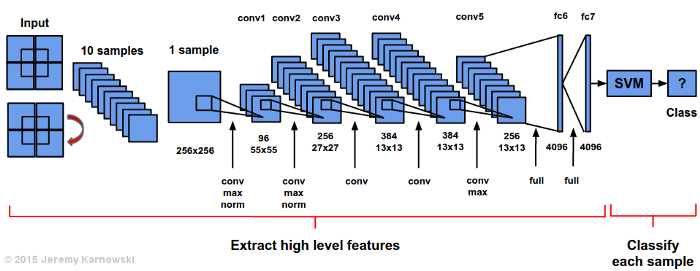
For the conference presentation and eventually for my dissertation defense, I wanted to make use of a visualization of AlexNet. I was unable to find a satisfying visualization other than the original:
AlexNet from ImageNet 2012 (Implemented on 2 GPUs)
Another visualization of AlexNet is the graphical view (below), which also provides the difference between the original AlexNet and Caffe’s implementation (CaffeNet):
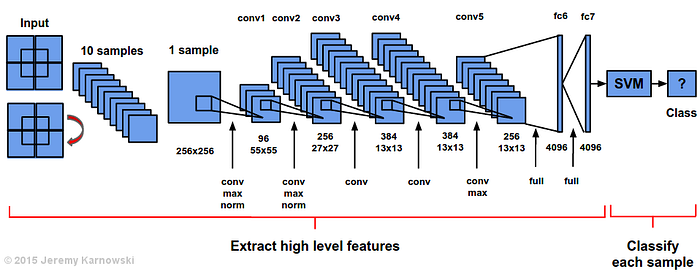
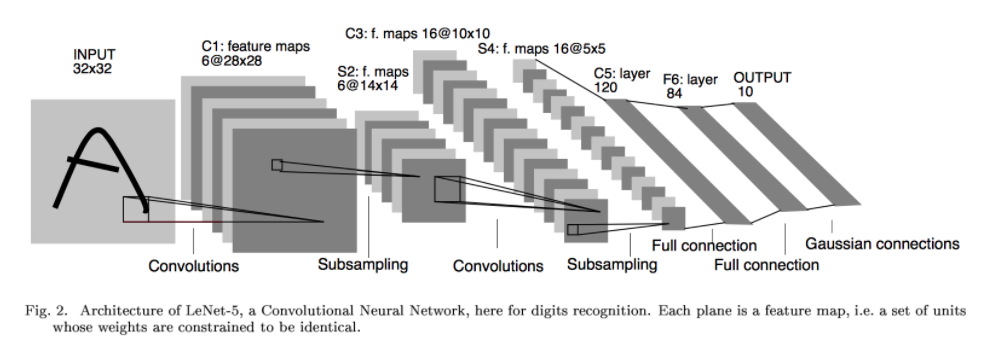
What I was really looking for was a visualization of AlexNet similar to the ones that exist for LeNet:
Here is my current visualization of AlexNet + SVM, a configuration I have been using for my specific classification tasks. I hope this can be useful for other researchers (give me a shout out someday) and I hope to update the image if anyone has helpful comments. Enjoy!
If you use this image in an academic context, please cite it. Thanks!
A few months ago I interviewed for a Software Engineering role at Google. I have had several friendsask me how I prepared for the interviews so I thought I would share my preparation in the hopes that it will help them and others. First off, the recruiters will give you documents providing an overview of what’s expected. Read them and get up to speed with all that information. But, be warned — once you start the interview process (in order to get that document), the interviews will come very quickly. With that in mind, it’s also good to prepare early. Below are links to things that helped me prepare:
I also searched a lot to find specifically how Python (or other languages) implements certain data structures and algorithms. I also spent time pretending Python did not have certain data structures or algorithms and programmed them from scratch using object oriented principles (you can Google ‘how to implement X in Python’ to find lots of examples). Here are the basics you should know:
Linked Lists — insertions, deletions, etc
Hash tables — know how hash tables are implemented in theory (i.e. be able to implement one using arrays) as well as how they are implemented in your language of choice.
Dynamic programming — always seems to come up. Some example problems can be found on sites like CodeEval.
Sorting — know how to implement quicksort, mergesort (and variations on them) but also be familiar with other sorting algorithms
Big-O — know how to analyze run times of algorithms!
Get a friend to do mock interviews with you. It would be better to do it with friends who are also trying to get jobs so you can push each other. Remember the following:
Ask clarifying questions to avoid any misunderstanding. In short, restate the question to confirm that you understand the problem being asked of you to solve.
Do not use any pseudocode, only full code.
Communicate your thought process while solving the problem. Interviewers want to understand how your mind works when approaching a problem. Always keep talking!
Best of luck! And remember — if you don’t make it the first time, keep reapplying!
[EDIT: I’ve updated the site to include information about setting up Caffe on Ubuntu 14.04 for laptop (no GPU), on Ubuntu 14.04 that has a GPU, and on Ubuntu 14.04 Server]
Initial Configurations
I started with a fresh install of Ubuntu 14.04 which installed Third-party software (install with internet connection). (on my laptop I did not start with a fresh system)
Install Titan Z in the tower. It requires a lot of power, so needs the power from the motherboard and 2 8-pin PEG connectors. (clearly not needed for non-GPU system)
Install the python suite (a standard list): sudo apt-get install python-numpy python-scipy python-dev python-pip python-nose
If you are installing opencv to use with a GPU, during step 5 (before ‘make’), you will run into issues. Use this fix to resolve the issue. Specifically, in /path/to/opencv-2.4.9/modules/gpu/src/nvidia/core, remove the ‘{static}’ characters from NCVPixelOperations.hpp that are identified in the code on the fix site. (Alternatively, you can use the code here, which has already removed those characters. Note: I tried this and it seemed to fail.)
After the above steps, it was impossible to sign into Ubuntu Server until the video was set to the Titan Z. Once that was done, it was possible to continue.
4. Unzip Boost 1.55 in /usr/local/ (or unzip it elsewhere and move it there)
On Ubuntu Server I received an error while loading shared libraries. This command solved the problem: sudo ldconfig /usr/local/cuda/lib64 (for 64-bit Ubuntu)
Add python folder to your .bashrc file (from Caffe’s site)
Additional items
Install other necessary packages: sudo pip install pandas sklearn scikit-image
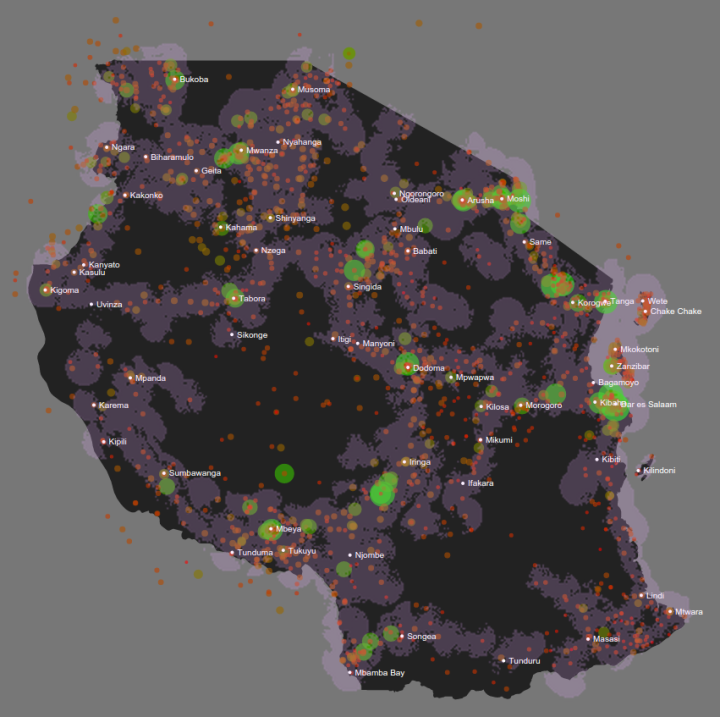
This map shows the performance of Form IV students at schools across Tanzania. Schools are ranked from best (large, green circles) to worst (small, red circles). Data was scraped from the NECTA (National Examinations Council of Tanzania) website and the Google Maps API was used with school names to retrieve GPS coordinates. Circles outside the country are due to noisy Google API calls.
Schools are named after the towns in which they are located. Using this information, we can remove the extra pieces of school name to only use the town name.
Reduce the variability by scraping information about school districts.
Create an additional layer to the image that shows the internet and cell phone coverage in the country (e.g. cell coverage) to demonstrate whether lack of service is correlated with low school performance. This would make a case for targeting areas of the country that don’t have internet access (see Khan Academy Lite).
Visualize the change in performance for the years 2008–2012 (e.g. Heat Maps over time). This represents a method to track whether interventions have been successful.